Monday, December 1, 2008
Teaching Philosophy
Saturday, November 29, 2008
Urban Renewal: Nature vs. City
Green Graffiti by Artist Edina Tokodi
Graffiti is virtually inescapable in cities, and is part of urban visual culture. One often finds spray painted names or images on building’s sides, street posts, newspaper stands, trucks, and buses. Graffiti art is commonly seen as vandalistic, defacing the city streets rather than contributing something productive. However, eco-minded street artist Edina Tokodi has taken a different approach, a more environmentally friendly approach to graffiti street art in the “barren patches of urban existence” (www.inhabitat.com). She argues that “our distance from nature is already cliché. City dwellers often have no relationship with animals or greenery. As a public artist I feel a sense of duty to draw attention to deficiencies in our everyday life” (www.inhabitat.com). Her work consists of moss installations that she adheres to walls where graffiti might be otherwise be seen. Using a more eco-friendly method, she creates images such as prancing animals, trees or other objects found in nature. The most fascinating part of her work is that the moss will continue to grow as long as the artwork adheres to the wall or surface that it is placed.


 (Above Four images from www.inhabitat.com)
Questions for discussion:
- The general public does typically not embrace graffiti art. It is associated with vandalism and illegal activities. Artist Edina Tokodi does not get permission by the city or building owners to put her green graffiti up, so would you consider her actions and art to be illegal? Explain.
- Do you think the public would approve of Tokodi’s work? Why, or why not? What is difference between Tokodi”s work and other graffiti street artists?
- Do you consider Edina Tokodi to be an artist? Why, or why not?
- Would you rather see green graffiti rather than colorful aerosol spray painted graffiti? Why, or why not?
- What do you think are the motivating reasons behind Edina’s work?
Vertical Gardens: The art of organic architecture

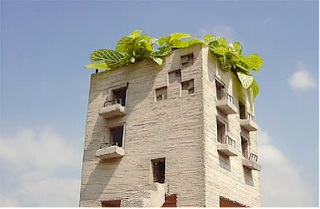
Imagine walking down the streets of a city and being surrounded by tall buildings covered with plants growing vertically up their sides? Not possible you say? Well it has actually been done!
Patrick Banc is responsible for creating eco-art or greener architecture. His work consists of a variety of plants that grow on the sides of modern concrete buildings. He carefully researches how plants adapt to extreme situations and studies which plants work best for his work.
Patrick Blanc has been commissioned to work for museums in Paris, Istanbul, Madrid, and Seoul. In an interview he explains how he creates his "Vertical Gardens". He states,
"The Vertical Garden is composed of three parts: a metal frame, a PVC layer and felt. The metal frame is hung on a wall or can be self-standing. It provides an air layer acting as a very efficient thermic and phonic isolation system. A 1 cm thick PVC sheet is then riveted on the metal frame. This layer brings rigidity to the whole structure and makes it waterproof. After that comes a felt layer made of polyamide that is stapled on the PVS. This felt is corrosion-resistant and its high capillarity allows a homogenous water distribution. The roots are now growing on this felt. Watering is provided from the top with tap water being supplemented with nutrients. The process of watering and fertilization is automated. The whole weight of the "Vertical Garden's, including plants and metal frame, is lower than 30 kg per square meter. Thus the Vertical Garden can be implemented on any wal without any size limitation of height". (http://www.pingmag.jp/2006/12/08/vertical-garden-the-art-of-organic-architecture/).
Questions for Discussion:
- How are Edina Todoki and Patrick Blanc similar? How are they different?
- Which do you think is more of an artist? Why, or why not?
- Which art work would you prefer to see in urban landscapes?
Discussion Activity
1. Break up the class into small groups of 3 or 4 students and have them brainstorm other ways to incorporate art (i.e fashion? cars?)
2. Have students design sketches of their ideas and designs to present to the class as if they were pitching their idea to a business.
Studio Activity: MOSS ART!
1. Students will first come up with a design, either abstract, or organic. This design will serve as a template that will eventually be covered in moss. HINT: Thick lines or solid shapes may be easier to fill with moss.
2. Each student should get a piece of masonite 11"x17". This will be the surface of their moss art. Students should draw their design on the masonite.
3. To make moss you will need 1) one or two cups of moss per students. 2) two cups of buttermilk. 3) two cups of water. 4) 1/2 tsp of sugar. 5) Blender 6) Container with lid. 7) Paintbrush.
4) Blend ingredients together, and have students paint mixture onto surface.
5) Explain and have students mist their piece twice a week. Soon, they will see the moss grow covering their design and making it a living piece of art work!
6) Students should discuss the use of living grass as a medium in art. Have students reflect on the project and consider other ways of using nature as art, and write a written reflection on the project!
Conclusion:
1. In a class discussion, have students reflect, and explain what they have learned in this unit. Ask the students, which activity they found most interesting, which activity was least interesting, and why?
2. Have students think and explore other tools and mediums that are eco-friendly and can be used to make art.
References:
Arkkitehtuuria, A. (2008, February).
Green Moss Graffiti. Retrieved April 29, 2008 from http://aitoa.wordpress.com/2008/02/07/green-moss-graffiti/.
Alter, L. (2007, November). Green
Roofs: We Could Only Build It This Big. Retrieved April 29, 2008 from http://www.treehugger.com/files/2007/11/green_roofs_we.php
Blanc, P. (n.a). Vertical Garden.
Retrieved April 29, 2008 from www.verticalgardenpartrikblanc.com
Doan, A. (2007, October). Green
Graffiti by Artist Edina Tokodi. Retrieved April 29, 2008 from http://www.inhabitat.com/2007/10/24/urban-moss-graffiti-by-edina-tokodi/
Heavy Petal. (n/a). Operation: Moss
Graffiti. Retrieved April 29, 2008 from http://www.heavypetal.ca/archives/2007/04/operation_moss_graffiti.html
Pingmag. (2006). Vertical Garden: The
Art of Organic Architecture. Retrieved April 29, 2008 from http://www.pingmag.jp/2006/12/08/vertical-garden-the-art-of-organic-architecture/
Monday, November 24, 2008
WEBQUEST: Build the Home of Your GREEN!

Build the Home of Your GREEN!
INTRODUCTION
Mission:
Welcome architects. If you are reading this message then congratulations, you and your team have been selected to design the home of your dreams. There is, however, a catch. In this mission you and your team’s design must be as environmentally friendly as possible. Your skills in research, design, artistic skill, environmental studies, and resourcefulness will all be put to the test. If you accept this mission, please click the mission button below:
Mission Statement
- Research environmentally friendly/ green architecture. You and your team should investigate and document your responses on the following ideas: what are some examples of eco friend homes? What made them so successful? How can you make your dream home self sufficient (i.e energy). You and your team will be required to show examples of other eco- friendly homes and be able to explain why they are successful in their design. Furthermore, it is important for you and your team to be able to reflect and argue why building a green home is important!
- Once your team has completed task one and research how to make homes environmentally friendly, please write a definition of what you and your team believe is a eco-friendly home.
- Specific details. Location-Where is your home being built? Weather- what type of environment will it be in? Design- you and your team will have to create a floor plan of your design. In addition to the floor plan, you and your team should draw the facade of your eco-friend home.
- Next, you and your team should also research ways to decorate your home with eco-friendly furniture. Perhaps even design some furniture of yourself, using recyclable material.
- Once you and your team have completed the tasks above, the last part of the mission is to present your idea as if you were trying to "sell" or "pitch" your idea to a client to buy. Therefore, you and your team should work on a presentation that is creative and displays your design and research for this mission.
Sunday, November 23, 2008
Wish you were here lesson plan

Teacher: Ms. Grace Ahn
Grade Level: 8th Grade
Title: Wish you were here….
Brief History and Background: Consider the purpose of postcards and how they are used to facilitate personal messages. Usually, one will purchase a postcard with an image on the front side that typically represents the location one is currently at, while on the reverse side, one will find a few sentences jotted down. With this said, it seems obvious that there is limited writing simply because the image says it all. This lesson plan,
“Wish you were here”, will encourage students to think and visually express what they considered to be home or their special pla
ce.
Standards:
NETS: 1.a,, 1.b,1.c, 2.b, 2.c, 2.d, 3.b, 3.c, 3.d, 4.b, 4.c, 4.d, 5. C, 6.d
PA: 9.1, 9.2, 9.3, 9.4
Goal: Students will use mixed media to create a postcard in which they will then scan into the computer and publish on the class on-line gallery/blog.
Objectives:
Students will research postcard art via the Internet or the school library
Students will reflect and think about what they consider to be home
Students will produce a postc
ard of their own depicting their personal home using mixed media
Students will learn how to upload their image onto the internet and publishing it in the classroom virtual art gallery/blog
Resource Materials/ Visual Aids:
-Post cards
-Student and teacher exemplars
-Computers for online research and publishing
-Library books on postcards
Supplies/ Material:
-White matte board cut to size 6”x8”
-Pencils
-Erasers
-Scissors
-Water Color
-Color markers
-Acrylic Paint
-Brushes
-Nature Magazines for cut out
-Glue
-Pen and Ink
Teacher Preparation:
Teachers must have white matte board cut to size prior to the students arriving. Materials should be organized and readily available for students. Since this project is mixed media and some students may use materials other might not, be prepared to have a wide variety of materials for students to use. When introducing this lesson, teacher should have an exemplar of the final project created by the teacher and other students. The teacher should also have material for students to research ideas. Therefore, library books should be made available, as well as internet sites which are appropriate for children to research. Perhaps have a few links already opened in a web browser or have the web site addresses written on the board for students.
Teaching:
Introduction: Begin this lesson by asking the students to think about what they consider home to be, and what they see in their minds when they think about home. This should lead into a short 5-minute discussion on home, special and personal spaces that have significant meaning and are what the students consider home. After the short introduction and discussion, show students the exemplars of what they will be creating. Explain that after they create their postcard, it will be scanned and published online in the art class virtual gallery/blog.
Directions:
- Have student’s research through books and web pages on postcard art.
- Have students produce a few sketches on what the consider home.
- Once they have an image or idea they are confident with, they can begin on the white matte board
- Students may use pen, markers, watercolor, magazine collage or paints to create their image. There is no specific medium they have to use however, it must be thoughtful and creative.
- When completed students will share with the class what they have produced and explain their thought process and reasoning for their design.
- Students will then learn how to scan, and upload their image onto the class virtual gallery/blog
Critique/ Evaluation/ Assessment:
Students will engage in a discussion and critique of the work they produced. Each student will present their work and talk about how they were able to visually represent their idea of home. Evaluation and assessment will be based on participation, creativity, respect, positive attitude, and completion of work.
Time:
This lesson will expand over three class periods:
Day 1- Research and sketches
Day 2- Production
Day 3- Critique/ and Virtual Gallery/Blog upload
Vocabulary:
Virtual
Blog
Gallery
Upload
Safety Concern:
N/A

Lesson Plan: Haiku Art!

Interdisciplinary Lesson Plan: Haiku Art!
Teacher: Ms. Grace Ahn
Grade: 4th Grade (can be adapted)
Brief History:
Haiku is a form of Japanese poetry in three metrical phrases of 5, 7, 5 respectively. Haiku’s are traditionally about nature and seasons, however are not limited to just that subject matter. In Japanese, Haiku’s are usually printed in a single vertical line, while haikus in English usually appear in three lines to emphasize the metrical count. Haiga is a traditional Japanese art form where one uses both an image and their haiku to convey their poem.
Standards:
PA 1.3 Reading analyzing and interpreting literature..
PA 1.4 Types of writing..
PA 7.1 Basic geography literacy
9.1 E Themes in Art Forms
9.1 H Historical and Cultural Production
9.2 A Context of Works in Arts
9.2 G Geographical Regions in the Arts
9.2 K Traditions within works in the arts
9.3 Critical response
9.4 B Aesthetic interpretation
9.4 D Aesthetic response- Artistic Choices
Goal:
Through understanding haiku’s and haiga students will create a work of art that visually represent their own written haiku poem.
Objectives:
Students will learn about haiku poetry
Students will have the experience of writing a haiku
Students will understand and can define Haiga
Students will create a work of art to enhance their haiku
Resources:
Examples of haiku poems- Both in Japanese and English
Examples of Haiga art- both Japanese and English
A map of Japan
Materials:
Pencil and paper
Pens
Markers
Construction paper
Scissors
Paint and brushes
Teacher preparation:
Teacher should have visual and written examples of haikus and haiga’s for students for refer to. All materials should be ready and organized for students to use. Exemplar of lesson product should also be made.
Introduction:
Begin class by giving a brief overview of haikus and haigas. Visual examples should be show to excite students as well as have them internalize the information better. Explain how haikus are metrical and involve a count of 5, 7 5 syllables. Go around the room and have students read examples of haikus.
Directions:
- Have students write their own haiku
- Once they have written their haiku, have students think about how they would visually represent their poem.
- Students should then use materials to create a composition that integrates both the haiku and their image.
- Students may create a mixed media piece using various materials or they have the option of using one specific technique (i.e painting, drawing etc.)
- Make sure students have their haiku written on their image
- Once everyone has completed students will present and read their haiku
Extension:
For students who have completed early, have them write a haiku that is the opposite of their original theme.
Time allocation:
Introduction- 5 min
Production- 30 min
Critique- 7 min
Clean up- 3 min
Safety concerns:
n/a
Bibliography:
http://en.wikipedia.org/wiki/Haiku
http://www.ahapoetry.com/HAIKU.HTM
http://www.insite.com.br/rodrigo/poet/haiku.html
Click here to see examples of a 3rd grade class haiku art project!


